Setting up a Workflow Process
Any business process can be developed into a workflow if it can be represented as a series of tasks within one or more stages.
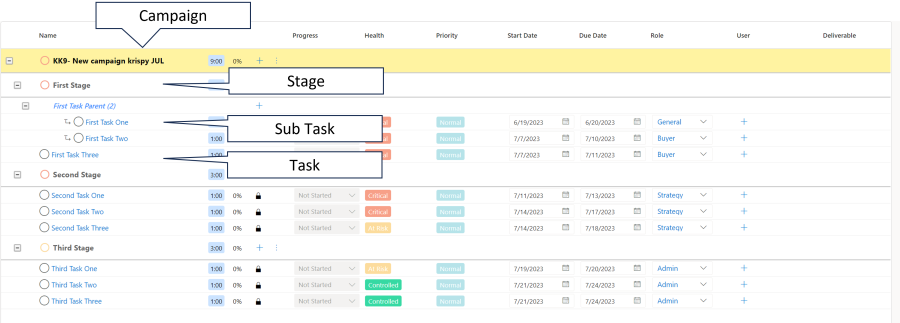
The Advvy workflow format and how workflows are displayed
Workflows in Advvy are made up of Stages, Activities and Subtasks. This three-tier system allows you to group like tasks together (these groupings are defined as Stages), provide the steps required to complete each Stage (these steps are defined as Activities), and gives users the option break up complex activities into more refined steps (these steps are defined as Subtasks). Combining all three entities together creates a complete workflow in Advvy.
The image below shows an example of Stages, Activities and Subtasks as they appear in an Advvy workflow. Note that the Stages make up different groups of Activities and Subtasks. These tasks are what needs to be accomplished to complete the workflow. Also note that subtasks branch off of individual activities.
Workflow Levels
- Global
- Agency
- Branch
- Master Client
- Clients
Workflow Features
- Allows multiple workflow definitions
- Allows agency to define Reporting Pillars used mainly for Dashboards/reporting
- Roles are created with assigned users and tasks
- Allows users to be assigned multiple roles
- Workflows can be created/applied to Campaign records
- Workflow tasks are automatically assigned to users performing the roles that applies to the tasks.
- Gives users the option to re-assign tasks to other users or roles
- Gives users the ability to apply status on tasks
- Allows set up of task conditions (email task) and dependencies (blocked by)
- Allows set up of sub tasks
- Allows set up of calculation of scheduled due dates at Stage level
- Allows optional workflow Stages
- Allows link to workflow deliverables or agency templates
- Allows simple approval task
- Allows agencies to display codes on workflow stages and tasks
-
Allows tasks to be linked to Media Type or Media Type Segment
- Captures history or changes to the workflow status
How to Build a Workflow
- Define Reporting Pillars
- Define Workflow Roles
- Create New Workflow Definition
- Create New Workflow Stages
- Create New Workflow Tasks
- Activate your Workflow
Workflows can also be defined using excel import templates. Contact your Customer Success team to find out more.
1. Define Reporting Pillars
Reporting Pillars are used to define the Stage ‘type’ and to provide a common reporting definition across different workflows.
For example Workflow A, has three stages defined, and Workflow B has five stages defined. It doesn’t matter what the stages are called or what steps are within each stage for either workflow, but a common reporting pillar for ‘planning’ can be set for Stage 2 in Workflow A and Stage 3 in Workflow B – meaning those tasks can be reported on in a similar way.
To create Reporting Pillars:
- Navigate to Agency Settings > Workflow> Reporting Pillars.
The Active Media Workflow Reporting Pillars view will be displayed. - Click + NEW on the ribbon.
The New Media Workflow Reporting Pillar form will be displayed. - Enter Reporting Pillar details:
- Enter the name of the pillar the Reporting Pillar field
- Enter the workflow type as Campaign – (default option, other options are Project and Master Brief)
- Enter the Sort Order number – used for selection
- Select the Colour – used for reporting (optional)
- Click SAVE & CLOSE on the ribbon to create the new entry.
Note: Ensure all reporting pillar names are unique.
2. Define Workflow Roles
Workflow Roles are used to define Tasks and relate to user profiles with matching roles. Users who have workflow roles added to their profile can then be matched to tasks that have the same workflow role defined.
To create Workflow Roles:
- Navigate to Agency Settings > Workflow> Media Workflow Roles.
The Active Media Workflow Roles view will be displayed. - Click + NEW on the ribbon.
The New Media Workflow Roles form will be displayed. - Enter Workflow Role details:
- Enter the name of the Role the Name field
- Click SAVE & CLOSE on the ribbon to create the new entry.
Note: Ensure all Workflow Roles names are unique.
3. Create New Workflow Template
The workflow template is the “name” of the workflow. Once a new workflow name is ‘saved’, the workflow template record will open the form to add Stages.
Workflows are usually defined as Global Workflow Types meaning the workflow can be used by all entities in the enterprise hierarchy, all agencies, all branches, all clients etc.
Other Workflow Types can be used to further restrict visibility and access to the workflow based on the Agency, Branch, Master Client or even Client. Client level workflows will only apply to a single client, meaning you can create specific workflows that meet the particular needs of individual clients.
To create a New Workflow:
- Navigate to Agency Settings > Workflow> Media Workflow.
The Active Media Workflows view will be displayed. - Click + NEW on the ribbon.
The New Workflow Template form will be displayed - Enter Workflow Name details:
- Enter the name of the Workflow the Name field
- Enter the workflow type as Campaign – (default option, other option is Project)
- Enter the Workflow Level as Global if this workflow is to be used across the entire enterprise.
(Other options are Agency – to restrict use to a single Agency; Branch – to restrict use to a single Branch within an agency ; Master Client – to restrict use to only the Clients related to the Master Client; Client – to restrict use to only a single client) - Select is the workflow Is Default – Yes/No – Setting this to Yes makes this workflow the preselected one for new campaign/project records. (only one workflow can be set as default for the Global level)
- Click SAVE on the ribbon to create the new workflow and open the form to add Stages.
4. Create New Workflow Stages
A workflow can have one or more stages defined depending on the complexity of the process. A simple checklist process may only require one or two stages, whereas an end-to-end campaign process from brief to buy may need 5 or 6 stages. Consider naming the stages to represent milestone phases for your workflow that can be reflected in reporting.
To create a New Stage:
- From the previous step, navigate to the Workflow Template – the Workflow Stages grid will be displayed.
- Within the Workflow Stages grid, Click + New Media Workflow Stage button on the toolbar.
The New Media Workflow Stage Definition form will be displayed. - Enter the Stage Information details:
- Name
- Order
- Reporting Pillar
- Include in Initial Creation – mandatory – optional
- Information link
- Milestones: Calculation Method – Before (or After)
- Milestones: Calculation Based On – Start Date (or Date Brief Received, End Date)
- Milestones: Num Days for Ideal Timeframe = 1 (or any number of days)
- Click SAVE & CLOSE on the ribbon to create the new stage. Repeat steps 2-4 for each new stage you need for your workflow.
- Once the stages have been created, proceed to create New Tasks within the Workflow Stages.
5. Create New Workflow Tasks
A Stage can have one or more tasks defined depending on the complexity of the stage and the process to be followed.
Tasks can be defined as Standard or Complex. Standard tasks are the top level task, and Complex Tasks are tasks that have sub-tasks defined at the next level.
Once task information has been saved the first time, additional form grids will display allowing the task to have additional criteria added, such as Blocked and Blocking tasks, Media Type Specialties etc.
To create a New Task:
- From the previous step, navigate to the Media Workflow Stage Definition – the Workflow Stages grid will be displayed.
- Within the Workflow Stages Grid, select a Stage – the Workflow Activities grid will be displayed.
- Within the Workflow Activities grid, Click + New Media Workflow Activity button on the toolbar.
The New Media Workflow Activity Definition form will be displayed - Enter the Activity Information details:
- Name
- Order
- Activity Type – Standard (or Complex if you want to have sub-tasks under this task)
- Role – select a Workflow role
- Role Locked – No (select Yes if this task must only be performed by a person with this exact role)
- Information link
- Workflow Deliverable
- Description
- Enter Reporting & Filtering details (optional)
- Media Type Segment
- Baseline Reporting (check if this task is to appear in Baseline reports)
- Report for SLA (Check this is this task is to appear in SLA reports)
- Report for Parent – No (select Yes if this task is to be made visible to Parent campaigns, or through to a Client Portal)
- Enter Milestones – Due Dates (optional)
- Calculation Method – Before (or None, After)
- Calculation Based On – Stage Due Date (or Start Date, Date Brief Received, End Date, Date Record Created)
- Num Days for Ideal Timeframe = 1 (or any number of days)
- Enter Milestones – Start Dates (optional but Recommended)
- Start Date Calculation Method – Weight in Days (or hours)
- Weight – 1.00 (or any number of units)
- Enter Task Recurrence details: (optional – use of this task need to be repeated)
- Recurrence delayed – No (or set to yes if you want to create the recurrence at a time later that campaign creation)
- Recurrence Direction – Following (or Preceding)
- Recurrence Frequency – None (or Weekly, Monthly)
- Recur on – Monday (days of week)
- Max Recurrences – set a value
- Click SAVE on the ribbon to create the new task. Additional task information grids will be displayed for Media Type Specialties, Blocked By and Blocking (optional).
- Click SAVE & CLOSE on the ribbon to return to the stage view where the new task will be listed.
- Repeat steps 3-10 for any new tasks to be created. See XXXX for more information about Complex Tasks and Building better workflows.
6. Activate your Workflow
Once a new workflow is created, it will have a status set in Draft.
Select ‘Active’ and then select SAVE & CLOSE to activate the workflow. This will ensure the workflow appears in the list of options for a new campaign/project record.
Note: If you edit an existing workflow, it will automatically be put in a ‘Draft’ status again, awaiting the editor to set it to ‘Active” when the workflow is finalised.
Previous article: 3 Setting up your Master Data Next article: 5 Organise Users and Teams